

California Dreaming Pumpkin Kasha
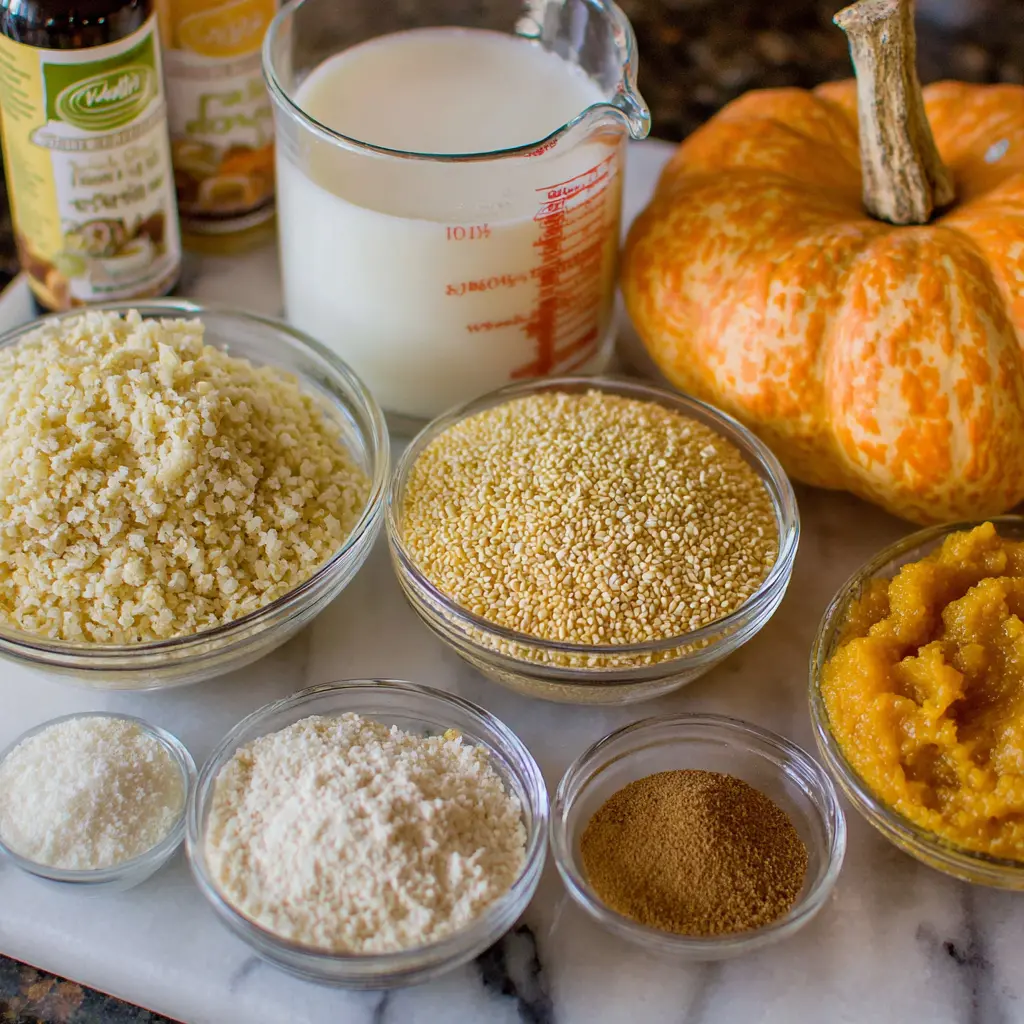
Ingredients
Method
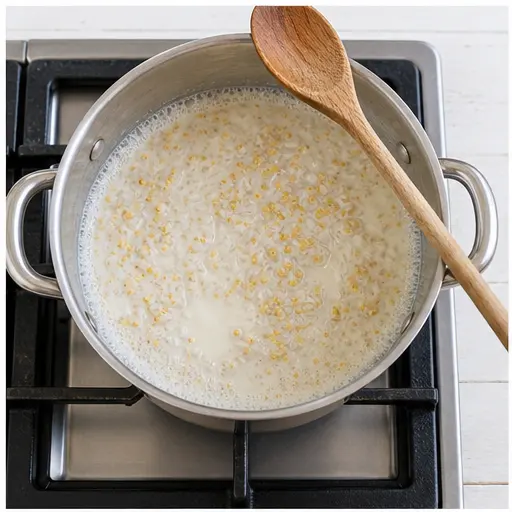
- In a large saucepan over medium-high heat, bring the milk to a boil. Stir in the rice and millet, then reduce the heat to medium-low. Let it simmer gently, stirring occasionally, until the grains are tender and fully cooked, about 20 to 30 minutes.
- Preheat your oven to 350 degrees Fahrenheit. Lightly butter the bottom of a ceramic baking dish.
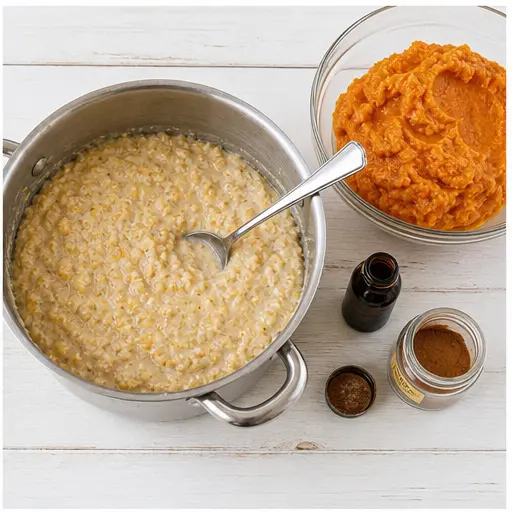
- Remove the saucepan from the heat. Stir in the vanilla extract, cinnamon, and sugar until well combined, then fold in the pumpkin puree until the mixture is smooth and evenly colored.
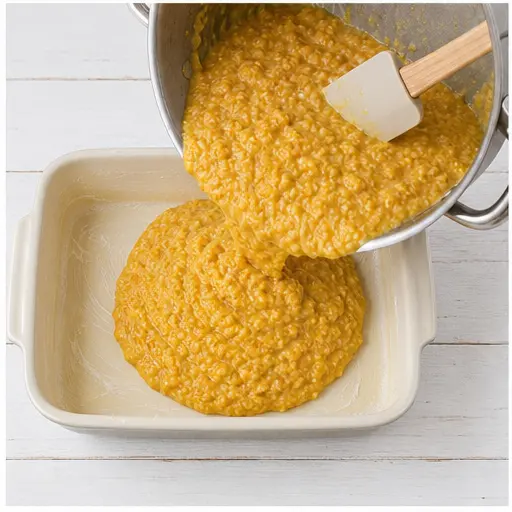
- Transfer the mixture to the prepared baking dish, spreading it into an even layer.
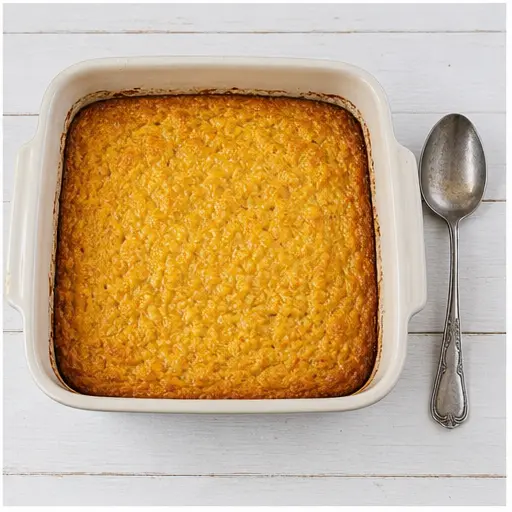
- Bake for about 1 hour, or until the edges are golden brown and the center is set. Let it cool slightly before serving.
Nutrition
Notes
Tried this recipe?
Let us know how it was!Why You’ll Love This Pumpkin Kasha
I used to think kasha was just a sad health food. You know the type bland, beige, something you eat because you should, not because you want to. But then my grandmother’s old recipe box turned up, and this pumpkin kasha completely changed my mind.
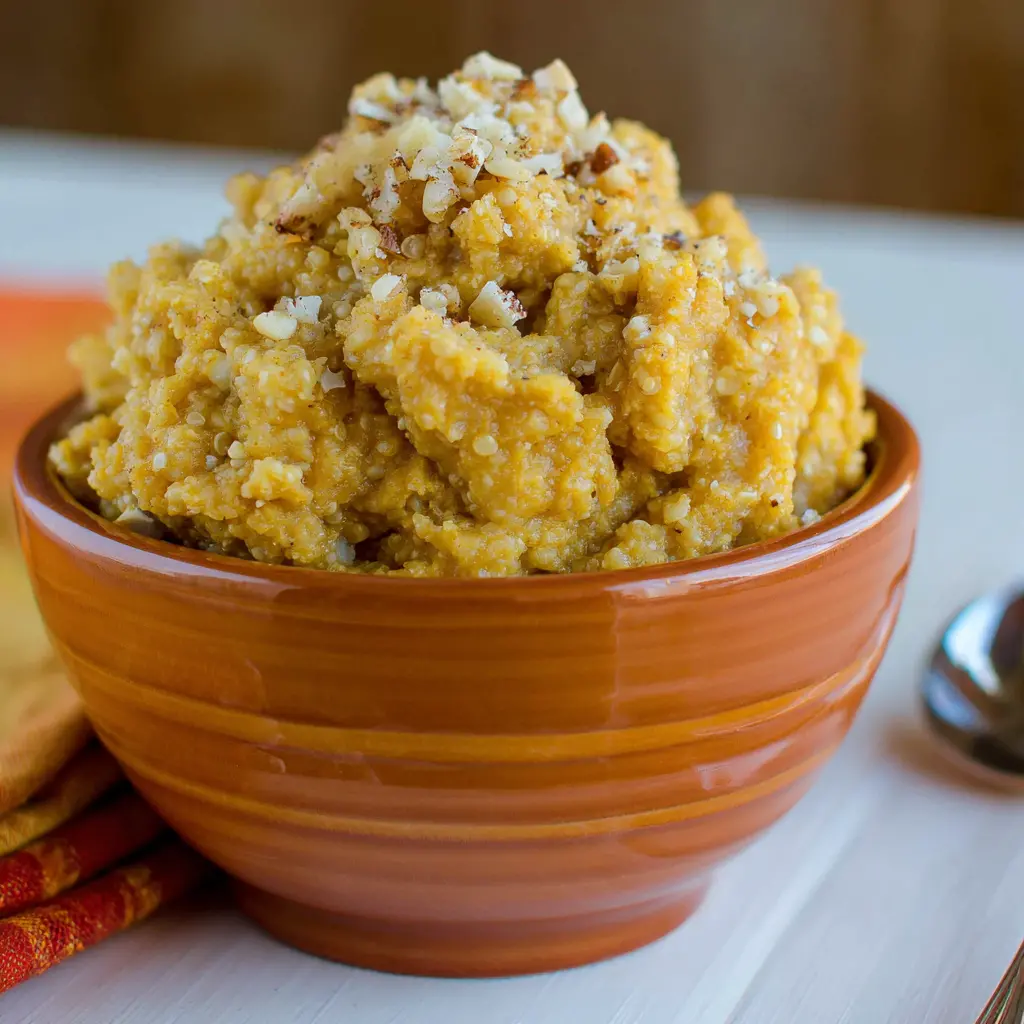
This isn’t your average porridge. It’s creamy, it’s comforting, and honestly? It tastes like a hug in a bowl. The millet and rice cook up tender in whole milk, then get folded together with pumpkin puree and warm cinnamon. The result is this gorgeous golden-orange pudding that works for breakfast or dessert.
And here’s the thing it’s actually good for you. Pumpkin is packed with vitamin A and fiber, millet is a gluten-free grain with a low glycemic index, and the whole milk adds protein and calcium. So you get a diabetic-friendly porridge that keeps you full for hours without spiking your blood sugar.
Plus, it’s budget-friendly. You probably already have most of these ingredients in your pantry. Canned pumpkin, rice, millet, milk, sugar, vanilla, cinnamon that’s it. No fancy trips to a specialty store.
Whether you call it a traditional kasha recipe, a Russian kasha, or just a really good warm grain bowl, this one’s a keeper. Trust me.
Making Your Own Pumpkin Puree from Scratch
You can absolutely use canned pumpkin puree here and honestly, that’s what I do most of the time. But if you’ve got a sugar pumpkin or a butternut squash sitting on your counter, making your own puree is super simple and tastes amazing.
Here’s how:
- Cut and seed: Slice your pumpkin in half, scoop out the seeds and stringy bits.
- Roast: Place the halves cut-side down on a baking sheet. Roast at 400°F for about 45 minutes, until the flesh is fork-tender.
- Scoop and blend: Let it cool, then scoop out the flesh. Blend or mash until smooth.
If you’re using canned, make sure you grab pumpkin puree, not pumpkin pie filling. The pie filling has added sugar and spices, which will throw off the balance here. You want pure, 100% pumpkin.
Either way, you’ll need 2 cups of puree for this pumpkin kasha recipe. A standard 15-ounce can gives you about 1¾ cups, so you might need a little extra from a second can or some fresh.
How to Prepare Pumpkin Kasha
This is one of those one-pot kasha recipes that feels way more impressive than it actually is. The whole process has four main stages, and I’ll walk you through each one.
Stage 1: Cook the grains in milk.
Start by bringing 4 cups of whole milk to a boil in a large saucepan. Stir in ¾ cup white rice and ½ cup millet, then reduce the heat to medium-low. Let it simmer gently for about 20 to 30 minutes, stirring every now and then. You’ll see the grains plump up and the milk thicken into a creamy base. Just be careful not to let the milk scorch on the bottom stir occasionally, especially toward the end.
Stage 2: Mix in the pumpkin and spices.
Once the grains are tender and the mixture is thick, remove the saucepan from the heat. Stir in 1 tablespoon vanilla extract, 1 teaspoon ground cinnamon, and 3 tablespoons granulated sugar. Then gently fold in the 2 cups of pumpkin puree until everything is smooth and evenly colored. The kitchen will smell incredible at this point like warm pumpkin spice kasha.
Stage 3: Transfer to a baking dish.
Preheat your oven to 350°F. Lightly butter the bottom of a ceramic baking dish this helps prevent sticking and adds a little richness. Pour the pumpkin-grain mixture into the dish and spread it into an even layer.
Stage 4: Bake until set.
Bake for about 1 hour, or until the edges are golden brown and the center is set but still a little jiggly. You don’t want to overbake it the center should stay creamy, like a soft pudding. Let it cool for a few minutes before serving.
Grandma’s Top Tips for the Best Pumpkin Kasha
My first batch of this pumpkin kasha was a little too dry. I learned a few things since then, and I’m sharing them so you don’t make the same mistakes.
- Use whole milk for the creamiest texture. It makes a huge difference. If you need dairy-free, oat milk or coconut milk work well, but the texture won’t be quite as rich.
- Don’t skip the butter on the baking dish. It adds a subtle flavor and helps the edges get that gorgeous golden crust.
- Stir the milk mixture occasionally while it simmers. Millet and rice can stick to the bottom if you walk away for too long.
- Let it cool slightly before serving. The kasha thickens as it cools, so give it a few minutes to set up properly.
- Tweak the sweetness to your taste. Three tablespoons of sugar gives a mild sweetness. Add more if you like it sweeter, or skip it entirely for a savory kasha recipe.
Ways to Serve Pumpkin Kasha
This is where you can get creative. The base recipe is versatile enough to go sweet or savory, breakfast or dessert.
For breakfast:
- Top with a dollop of yogurt and a drizzle of honey
- Sprinkle with chopped nuts or pumpkin seeds for crunch
- Add fresh berries or sliced banana on the side
For dessert:
- Serve warm with a scoop of vanilla ice cream
- Add a swirl of whipped cream and a pinch of extra cinnamon
- Drizzle with maple syrup or caramel sauce
For a savory twist:
- Skip the sugar and cinnamon, add a pinch of salt and black pepper
- Top with roasted vegetables and a fried egg for a hearty dinner bowl
- Serve as a side dish alongside roasted chicken or fish
Honestly, I love it best as a warm breakfast on a cool morning. It’s like a healthy pumpkin breakfast that actually feels indulgent.
Storing, Freezing, and Reheating
This pumpkin kasha is perfect for meal prep. It keeps well and reheats beautifully.
- Fridge: Store in an airtight container for up to 5 days.
- Freezer: Portion into individual freezer-safe bags or containers. Freeze for up to 3 months.
- Reheat: Add a splash of milk to rehydrate the grains, then microwave in 30-second bursts, stirring between each. Or reheat gently on the stovetop over low heat, adding milk as needed to reach your desired consistency.
Thaw frozen portions in the fridge overnight or on the counter for a few hours before reheating.

Common Mistakes and Troubleshooting
Even with a simple recipe like this, things can go wrong. Here’s how to fix them.
❌ The kasha is too dry.
✅ Add a splash of milk and stir. The grains will absorb the liquid and soften up. This is a very forgiving recipe.
❌ The milk burned on the bottom of the pan.
✅ Stir more frequently, especially toward the end of simmering. If it’s just a little scorched, don’t scrape the bottom into the dish leave the burnt bits behind.
❌ The center is too runny after baking.
✅ It will thicken as it cools. Let it sit for 10-15 minutes before serving. If it’s still too loose, pop it back in the oven for another 10 minutes.
❌ The kasha is too sweet (or not sweet enough).
✅ Adjust the sugar next time. You can also balance sweetness with a pinch of salt or a squeeze of lemon juice.
Health Benefits of Pumpkin Kasha
This isn’t just a delicious recipe it’s genuinely good for you. Here’s why.
- Pumpkin is loaded with vitamin A, fiber, and antioxidants. It supports eye health and digestion.
- Millet is a gluten-free grain with a low glycemic index, making it a great choice for blood sugar management.
- White rice is easy to digest and provides quick energy.
- Whole milk adds protein, calcium, and vitamin D for strong bones.
Together, these ingredients make a diabetic-friendly porridge that keeps you full and satisfied without the crash. It’s a warm grain bowl you can feel good about eating.
Frequently Asked Questions
More Tasty Pumpkin Recipes
If you love this pumpkin kasha, you might also enjoy these pumpkin recipes:
- Pumpkin Oatmeal with Cinnamon and Walnuts
- Savory Pumpkin Soup with Ginger
- Pumpkin and Millet Stuffed Bell Peppers
- No-Bake Pumpkin Energy Balls
I hope you love this recipe as much as I do. Make this and tag me I want to see your beautiful bowls! And if you’re looking for more inspiration, check out my Pinterest board full of cozy grain bowl ideas.
Source: Nutritional Information
Leave a Reply