
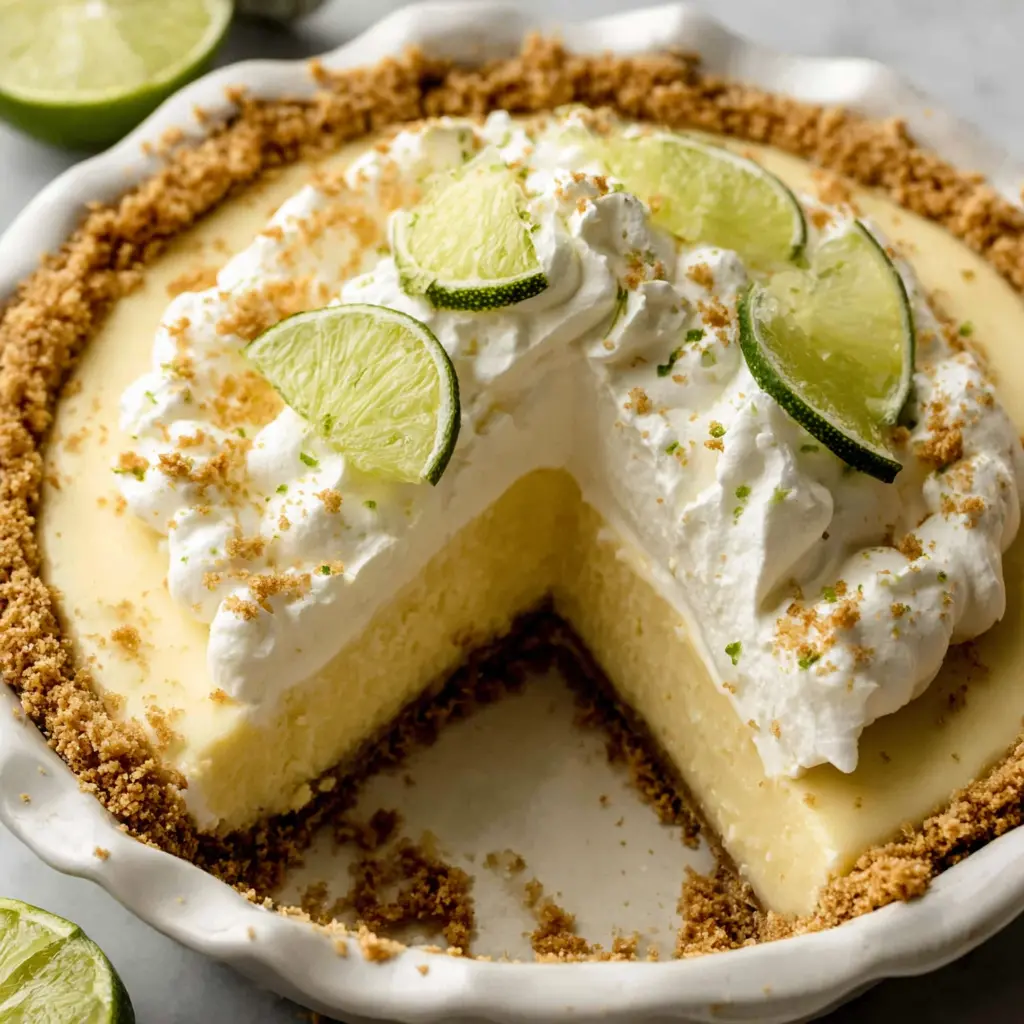

California-Inspired Classic Key Lime Pie with Graham Cracker Crust
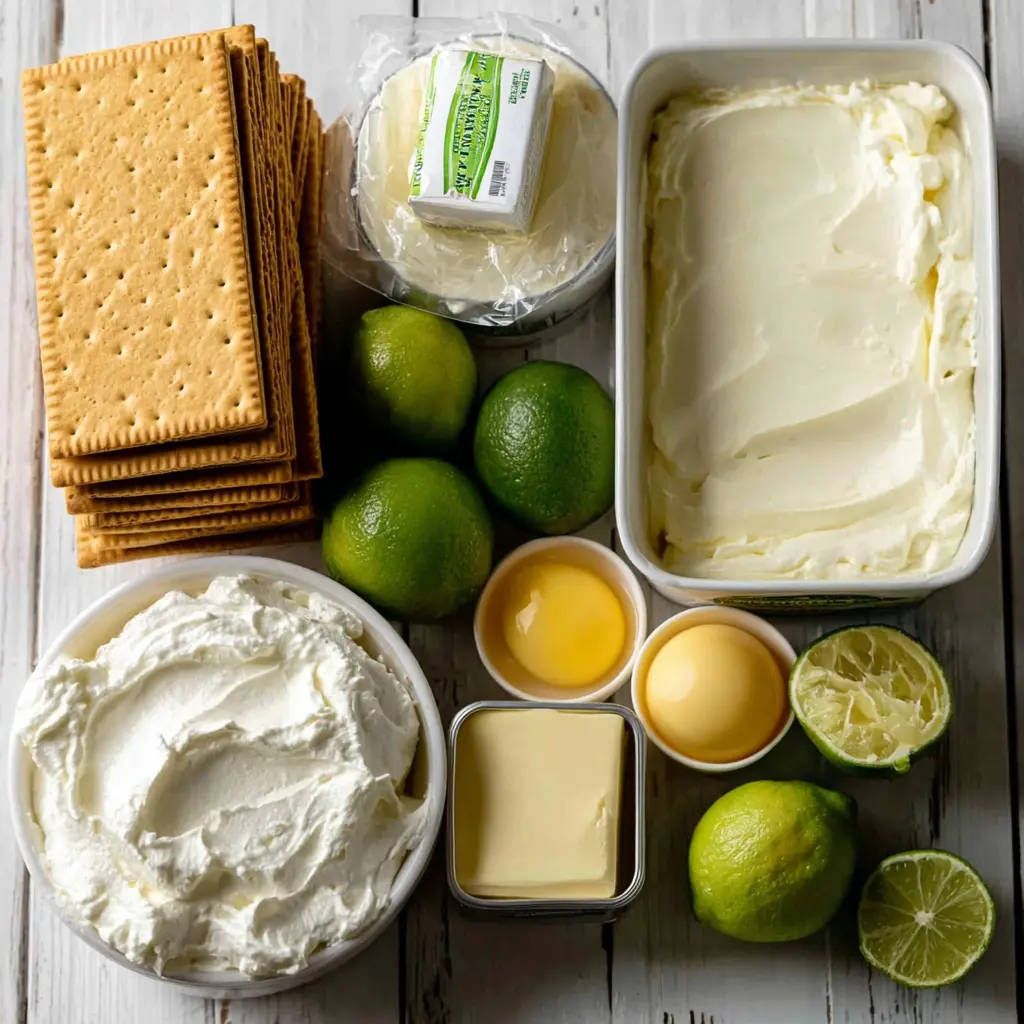
Ingredients
Method
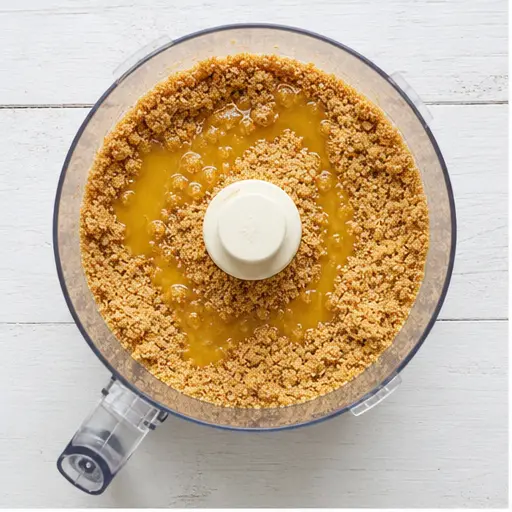
- Preheat your oven to 350°F (175°C). In a food processor, finely grind the graham cracker sheets into crumbs. Incorporate the melted butter and pulse until well combined. Alternatively, crush crackers in a sealed bag with a rolling pin and stir in melted butter.
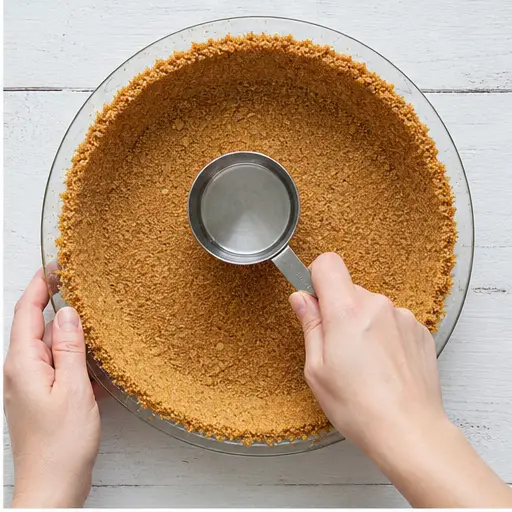
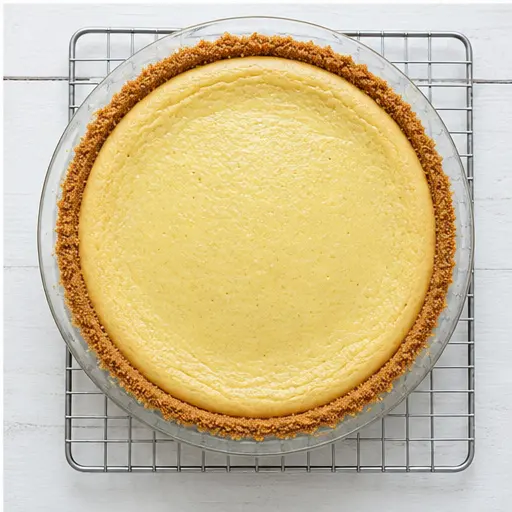
- Firmly press the mixture into a 9-inch pie pan, using the back of a measuring cup or a small glass to create an even layer. Bake the crust for 8 minutes, then set it aside to cool completely.
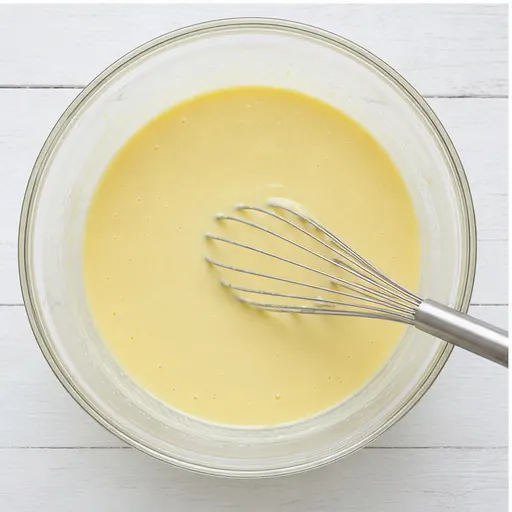
- In a medium mixing bowl, whisk together the sweetened condensed milk, egg yolks, Key lime juice, Key lime zest, and sour cream until the mixture is smooth and fully blended. Pour this vibrant filling into your cooled graham cracker crust.
- Bake the pie for 10 minutes. After baking, remove the pie from the oven and allow it to cool on a wire rack at room temperature before transferring it to the refrigerator. It is crucial to chill the pie for a minimum of 4 hours, or ideally overnight, to ensure it sets properly before slicing.
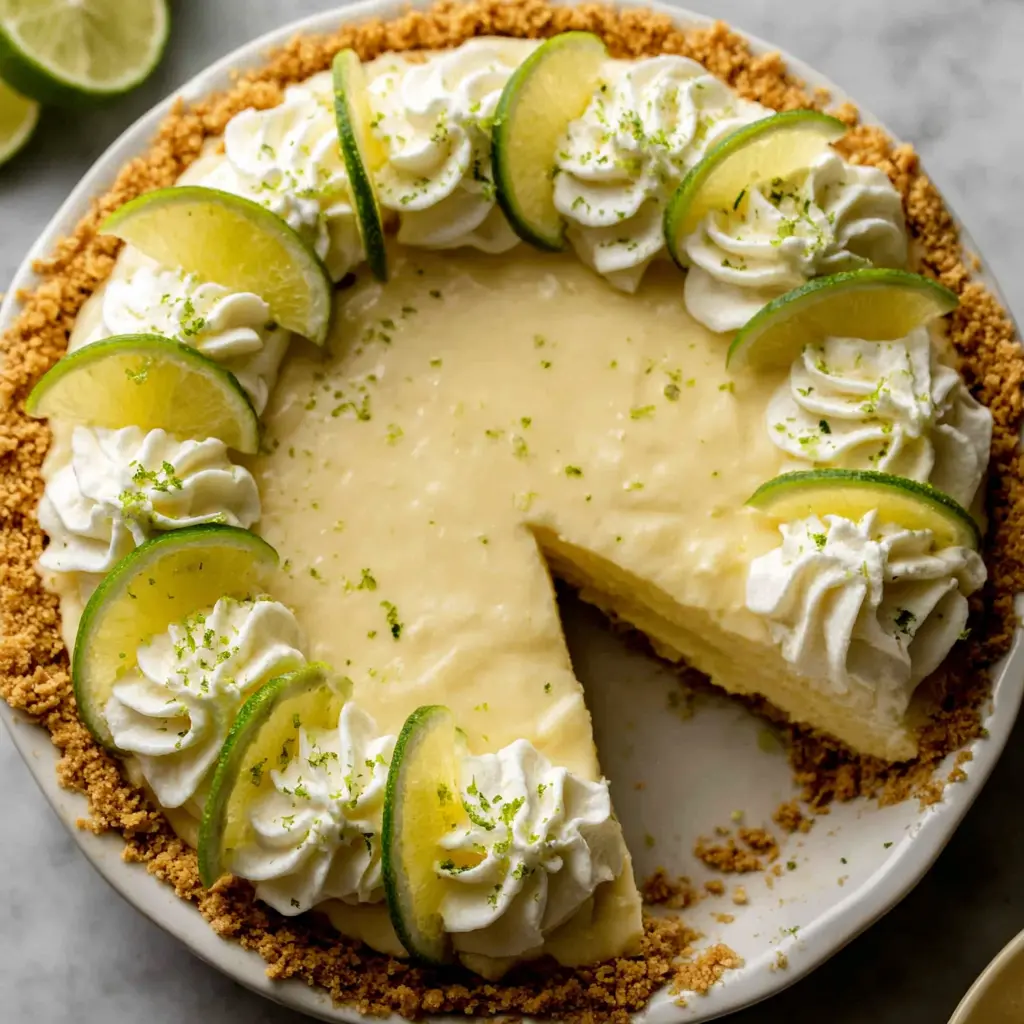
- In a large, chilled bowl, whip the cold heavy cream using an electric mixer until soft peaks begin to form. Gently fold in the confectioners’ sugar until just combined. Serve each slice of pie with a generous dollop of this fresh whipped cream, or pipe it decoratively over the entire pie before serving.
Nutrition
Notes
Tried this recipe?
Let us know how it was!Why This Key Lime Pie Recipe Works
Look, I’ve been there. You want the best key lime pie, but every recipe claims to be the one. And honestly? Most of them are fine. But fine isn’t what we’re after here. We want the kind of pie that makes people close their eyes when they take a bite. The kind that has that perfect balance of tart and sweet, with a crust that actually stays crunchy.
This recipe is my California take on the classic. I know, I know, adding sour cream sounds weird. But that’s the secret weapon right there. It gives the filling this incredible creaminess without making it heavy. And the best part? It’s only seven ingredients. Seven. You probably have most of them in your kitchen right now.
I’ve tested this recipe more times than I care to admit. Burned a few crusts, over-whipped some cream, you name it. But what I landed on is a homemade key lime pie that’s foolproof. No weird techniques, no specialty equipment you’ll never use again. Just a simple, stunning dessert that tastes like summer.
Ingredients You’ll Need
Let’s talk about what goes into this beauty. The ingredient list is short, so each one really matters. Here’s the deal with each:
- Graham crackers – 12 sheets, ground into crumbs. This is the foundation of that classic graham cracker crust. I use salted butter to bind it, which adds a little savory note that balances the sweet filling.
- Sweetened condensed milk – Two full cans. This is non-negotiable. It provides the sweetness and the structure for the filling. Condensed milk is what gives key lime pie that thick, creamy texture without needing to bake it for hours.
- Egg yolks – Just two large ones. They add richness and help the filling set. Don’t skip them, but also don’t stress about separating them perfectly.
- Sour cream – A half cup. This is my little twist. It adds tang and makes the filling extra silky. Trust me on this one.
- Fresh key lime juice – Three-quarters of a cup. Fresh is best, but if you’re using bottled juice (like Nellie & Joe’s), that works too. The tangy flavor is what makes this pie sing.
- Key lime zest – From one lime. Just a little goes a long way for aroma and color.
- Heavy whipping cream and confectioners’ sugar – For the topping. Homemade whipped cream is way better than store-bought, and it takes two minutes to make.
Step-by-Step Instructions
Alright, let’s get into the actual making of this pie. I’ll walk you through each stage, and I’ll tell you exactly what to look for so you know you’re on the right track.
How to Make the Graham Cracker Crust
First things first, preheat your oven to 350°F. You want it ready to go when the crust is done. Grab those 12 graham cracker sheets and toss them in a food processor. Pulse until they’re fine crumbs, like sand. If you don’t have a food processor, no worries. Put them in a sealed bag and go to town with a rolling pin. It’s a great way to release some frustration, honestly.
Pour the crumbs into a bowl and add 6 tablespoons of melted salted butter. Stir until every crumb is coated. It should look like wet sand. Now, press this mixture into a 9-inch pie pan. Start with the sides, then do the bottom. Use the back of a measuring cup or a small glass to press it firmly. You want it compact so it holds together after baking.
Bake the crust for 8 minutes. It should be lightly golden and smell amazing. Let it cool completely before adding the filling. Don’t rush this step, or you’ll end up with a soggy crust.
How to Make the Key Lime Filling
This is where the magic happens. In a medium mixing bowl, whisk together the two cans of sweetened condensed milk, 2 large egg yolks, 3/4 cup of fresh key lime juice, the zest from one key lime, and 1/2 cup of sour cream. Whisk until it’s completely smooth and a beautiful pale yellow color. The mixture will thicken slightly from the acid in the lime juice reacting with the condensed milk. That’s normal.
Pour this creamy filling into your cooled crust. Spread it evenly with a spatula. Bake for exactly 10 minutes. The center should be slightly jiggly, like Jell-O that’s almost set. It will continue to set as it cools, so don’t overbake it. Overbaking leads to a cracked, rubbery filling, and nobody wants that.
How to Make the Whipped Cream Topping
While the pie is cooling, make the whipped cream. Pour 1 1/2 cups of cold heavy whipping cream into a large chilled bowl. Using an electric mixer, whip on medium-high until soft peaks form. You’ll see the cream start to thicken and hold its shape. Then, gently fold in 1/3 cup of confectioners’ sugar. Don’t overmix, or you’ll end up with butter.
Once the pie is completely cool, spread or pipe the whipped cream on top. I like to pipe it in a swirl pattern, but a simple dollop on each slice works too. Add a little extra lime zest on top for color.
How to Tell When Key Lime Pie Is Done
This is the most common question I get. How do you know when it’s done? After 10 minutes of baking, the filling should be set around the edges but still have a slight jiggle in the very center. Think of it like a soft-set cheesecake. If you shake the pan and the whole filling moves like a wave, it needs more time. If it barely moves at all, it’s perfect.
Another sign: the top should look matte, not glossy. And there should be no cracks. Cracks mean it’s overbaked. If you see cracks, don’t panic. The whipped cream will cover them.
The pie needs to chill for at least 4 hours, but overnight is better. This is crucial for the perfectly set texture. Patience, my friend. It’s worth it.
Tips for the Best Key Lime Pie
Over the years, I’ve learned a few things that make a real difference. Here are my top tips:
- Use room temperature ingredients. This is especially important for the egg yolks and sour cream. If they’re cold, the filling won’t emulsify properly, and you’ll get a grainy texture.
- Don’t skip the zest. The lime zest adds essential oils that give the pie its bright, aromatic flavor. Just the zest from one lime is enough.
- Chill the pie overnight. I know, I said it already. But seriously, the flavor develops and the texture sets perfectly. A chilled dessert is always better.
- Use a sharp knife for clean slices. Dip it in hot water and wipe it clean between each cut. This gives you those beautiful, Instagram-worthy slices.
- Make the crust a day ahead. If you’re short on time on serving day, bake the crust the night before. Just add the filling on the day you plan to serve it.
Variations and Substitutions
This recipe is pretty flexible. Here are a few ways to change it up:
- Can’t find key limes? Use regular Persian limes. The flavor will be slightly less aromatic, but it’s still delicious. You can also use bottled key lime juice, like Nellie & Joe’s. It’s a great time-saver.
- Different crusts? You can use digestive biscuits if graham crackers aren’t available. Just add an extra tablespoon of sugar to the crumbs. Or try a vanilla wafer crust for a sweeter twist.
- Dairy-free option? Use a dairy-free condensed milk and a dairy-free sour cream. The texture might be slightly different, but it’s worth a try.
- Mini pies? Press the crust into a muffin tin and reduce the baking time to about 6-8 minutes. Perfect for parties.
How to Store and Freeze Key Lime Pie
Store leftover pie in the refrigerator, covered, for up to 3-4 days. The graham cracker crust might soften a little over time, but it’s still delicious.
To freeze, wrap the pie tightly in plastic wrap, then in foil. Freeze for up to 1 month. Thaw in the refrigerator overnight before serving. Don’t thaw at room temperature, or the crust will get soggy.
Pro tip: If you’re freezing individual slices, wrap each one separately. That way, you can grab a slice whenever the craving hits.
Frequently Asked Questions
I hope you love this best key lime pie recipe as much as I do. It’s become my go-to for summer gatherings, potlucks, and honestly, just because. There’s something so satisfying about pulling a perfectly set, tangy-sweet pie out of the fridge and watching people’s faces light up.
If you make it, I’d love to hear how it goes. Tag me in your photos, leave a comment, whatever feels right. And if you’re looking for more lime desserts or easy key lime pie inspiration, check out my Pinterest board below.
Pin this recipe for later on Pinterest
Source: Nutritional Information
Leave a Reply