
Why You’ll Love These Reese’s Campfire Cones
The fire’s crackling. The kids are circling the cooler. Someone just sighed “s’mores AGAIN?” for the third night in a row. I know that scene. We’ve all lived it. The camping food rut hits hard by night two, and the pressure to be the “fun parent” gets real. That’s exactly why I started making Reese’s campfire cones on every trip. These are basically waffle cone s’mores, but way better. You stuff a sturdy waffle cone with mini marshmallows, chocolate chips, and peanut butter cups, wrap it in foil, and let the fire do its magic. My first attempt? Total disaster. I forgot the foil. We ended up eating soggy cones with unmelted chocolate. The second time, I held it directly over the flames and watched the whole thing char in about nine seconds.What Are Campfire Cones?
Think of a foil packet dessert, but cone-shaped. You fill a waffle cone with goodies, seal it up, and cook it over coals. The marshmallows melt into a gooey chocolate campfire treat that tastes like a warm peanut butter cup. They’re one of the best easy camping recipes I know. No skewers. No burnt fingers. Just pure, molten goodness.
Ingredients Needed for Reese’s Campfire Cones
Here’s the thing about this campfire cones recipe. It only needs five ingredients. You probably already have most of them. You’ll need:- 1 large waffle cone (per person, so grab a box)
- 1/2 cup mini marshmallows, divided (they’re the glue that holds everything together)
- 2 tablespoons semi-sweet chocolate chips
- 3 miniature cups Reese’s Mini Peanut Butter Cups
- 2 tablespoons Reese’s Pieces (for that extra crunch)
How to Make Reese’s Campfire Cones
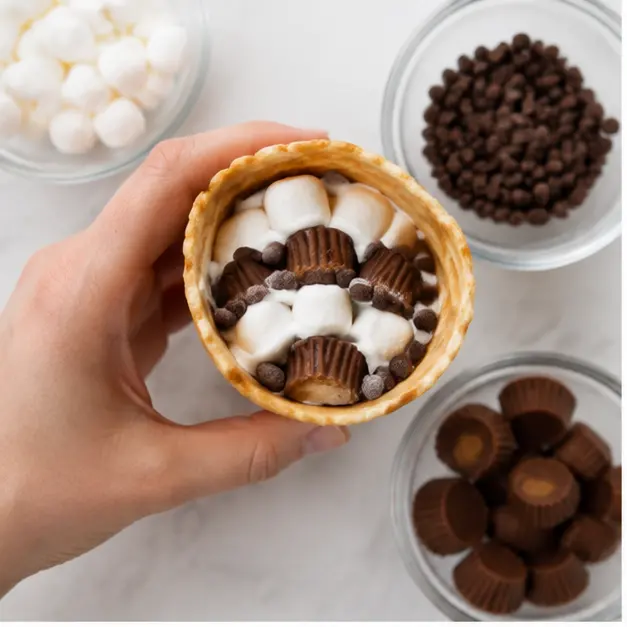
Okay, so the key to campfire cooking tips is really about the layering. Start with a layer of mini marshmallows at the bottom. This seals the point of the cone and catches all the melting chocolate. Then alternate. Chocolate chips. Reese’s cups. Reese’s Pieces. Top each layer with more marshmallows and press down gently. I call this the dessert cone bar moment. My six-year-old stuffs her own cone. It’s chaotic. Half the marshmallows end up in her hair. But that’s part of the fun. The golden rule? DO NOT hold the cone directly over flames. I promise you will regret it. Your future self says thanks. You want hot coals, not fire.Layer Like a Pro
Start and end with marshmallows: They melt into a sticky, gooey glue that holds everything inside the cone while it cooks. No air pockets. No leaks.
Wrap It Tight
Tear off a sheet of heavy-duty aluminum foil. You want the good stuff here, not the thin dollar-store kind. Trust me, it tears on the grill grates and you’ll be fishing chocolate out of the fire pit. Wrap each cone completely. Start with a tight seal across the top so the filling can’t escape. Then fold up the bottom and pleat the sides. Think of it like wrapping a burrito. Tight, but leave a little room for the marshmallow to expand.Cook Over Coals, Not Flames
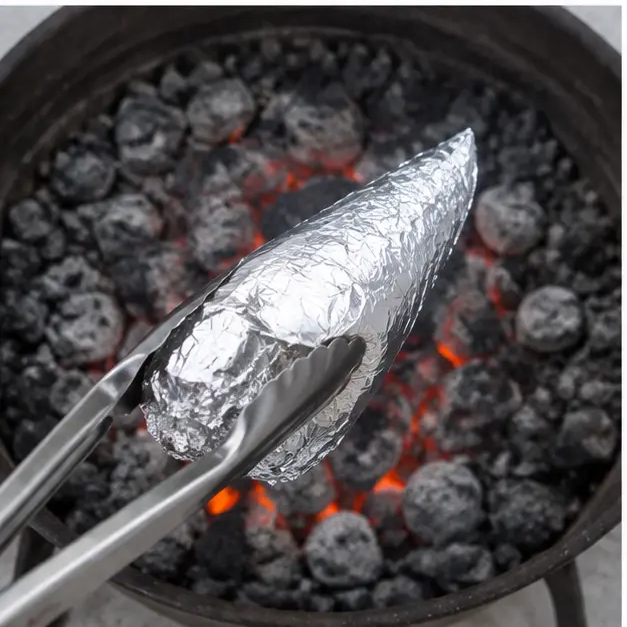
This is the most important campfire dessert idea I can give you. Set the foil-wrapped cones over hot coals or on grill grates. Not over the flames. The coals give you even, gentle heat that melts the chocolate without turning the cone into charcoal. Cook for **5 to 7 minutes**, turning every minute or two. You want the cone to smell toasty and feel warm all the way through.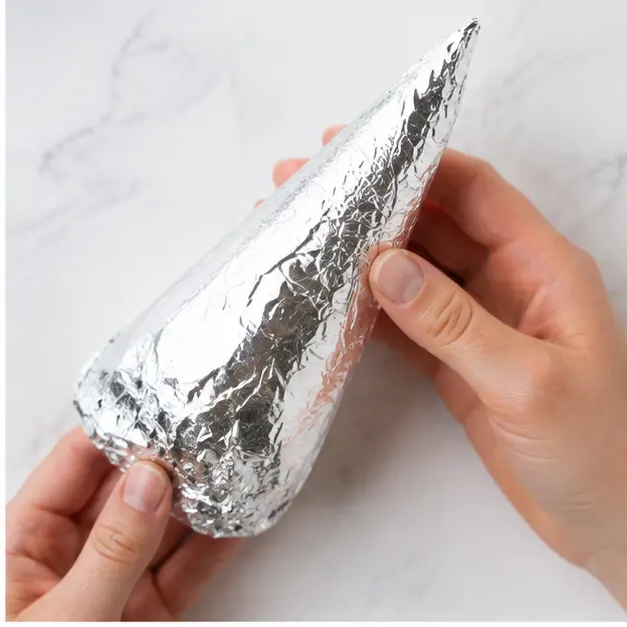
Visual Cues for Doneness
How do you know it’s done without cutting it open? Here’s what I look for:- The foil should feel hot and slightly puffed
- You’ll smell toasted waffle cone, not burnt sugar
- Chocolate might start peeking through the foil seams
- The cone sounds like it’s gently sizzling inside
The Unwrap
Lift the cones off the heat with tongs. Let them rest for a minute or two. I know. It’s hard. The smell is incredible. But the melted filling is dangerously hot, and patience prevents burned tongues. Then comes the best part. The foil-wrapped dessert reveal. Carefully peel back the foil. That theatrical steam whoosh hits your face. The marshmallow stretches like taffy when you pull. The chocolate is molten and dripping. Kids scramble. The camp dog “helpfully” circles, waiting for anything that hits the dirt. Just call it a campfire sundae bowl if the cone breaks. It still tastes amazing.
Cooking Methods: Campfire, Oven, or Grill
This recipe is flexible. And let me tell you, that’s a lifesaver. California fire restrictions are real. There’s nothing worse than planning a Labor Day camping dessert and then realizing open fires are banned. Here are your options:- Campfire: Set over hot coals, not flames. Turn every 1-2 minutes for 5-7 minutes.
- Gas grill: Same technique. Place on grill grates over medium heat. 5-7 minutes with frequent turning.
- Oven: Heat to 350°F. Place on a rimmed baking sheet. Bake for 10-15 minutes until the center feels warm.
Pro Tips for Perfect Campfire Cones
Press the layers down gently as you fill. You don’t want an overstuffed cone, but you also don’t want air pockets. A solid, snug fill = even melting. Let cones cool before unwrapping. I can’t stress this enough. The filling stays hot for a few minutes after leaving the fire. Give it a minute or two to rest. Your taste buds will thank you. Texture pairing: Mix textures by adding nuts, banana slices, or tiny pretzel pieces alongside your Reese’s and marshmallows. The crunch against the gooey is chef’s kiss.Common Mistakes to Avoid
❌ Using cake or sugar cones instead of sturdy waffle cones: They can break and create a mess. Stick with thick waffle cones.❌ Sealing foil too loosely: The filling will leak and you’ll lose chocolate to the fire.
❌ Not leaving room for expansion: Marshmallows puff up as they melt. Leave a tiny bit of space under the foil.
❌ Unwrapping too soon: Hot filling causes real burns. Patience pays off.
❌ Reusing foil between batches: Use fresh foil each time. Reusing risks poor sealing and hygiene.

Storage and Make-Ahead
Camping prep is a game-changer. You can assemble these no-mess camping treats up to 8 hours ahead of time. Wrap them tightly in foil and keep them in the cooler. They’re great for trips when you want to set up camp and relax instead of spending two hours on dinner prep. For leftovers: The waffle cone might soften if you store cooked cones. They’re really best served immediately. But if you have extras, I won’t judge you for eating them cold out of the foil the next morning. I’ve done it, and I’ll do it again.Frequently Asked Questions
Final Thoughts
These reeses campfire cones have become our family camping tradition. Night two of every trip, someone says “cones again?” And the answer is always yes. The best part? Watching the kids’ faces glow in the firelight as they peel back that foil. The steam whoosh. The stretchy marshmallow. The molten chocolate dripping down their chins. It’s the messiest, happiest moment of the trip. And honestly? It might just become your family’s favorite s’mores alternative too. **Ready to make these on your next trip?** Grab your ingredients and get packing. And if you loved this idea, I’d love for you to [save it on Pinterest](https://www.pinterest.com/0cckre4g6zt9edwjfrtuw3i2dy6jcf/ “Save this recipe for your next camping trip”) for your next adventure.
Gooey Reese's Campfire Cones
Reese's Campfire Cones are a warm, gooey campfire dessert made with waffle cones, marshmallows, chocolate chips, and peanut butter candy.
Ingredients
Method
- Spoon a layer of mini marshmallows into the bottom of each waffle cone, filling it about one-quarter to one-third full.
- Add the chocolate chips, Reese's Mini Peanut Butter Cups, and Reese's Pieces in alternating layers, topping each layer with a few more mini marshmallows and pressing down gently so everything fits snugly.
- Tear off a sheet of heavy-duty aluminum foil and wrap each cone completely, starting with a tight seal across the top so the filling cannot escape, then folding up the bottom and pleating the sides.
- If using the oven, heat it to 350°F, set the wrapped cones on a rimmed baking sheet, and bake for 10 to 15 minutes until the center feels warm and the chocolate is melted.
- For a campfire or gas grill, set the foil-wrapped cones over hot coals or on the grill grates, cooking for 5 to 7 minutes and turning them every minute or two until the filling is fully melted and the cone smells toasted.
- Lift the cones away from the heat with tongs and let them rest for a minute or two before handling.
- Carefully peel back the foil and enjoy the warm, gooey center right away.
Nutrition
Notes
Swap milk chocolate chips for semi-sweet to make the filling sweeter. Use a waffle cone that is wide enough to hold the filling without cracking when you wrap it. You can assemble these cones up to 8 hours ahead and keep them tightly wrapped in the fridge. Press the layers down gently as you fill so you do not overfill or leave air pockets. Heavy-duty foil is important because regular foil can tear on the grill grates. Let the cones cool for at least 2 minutes before unwrapping because the melted filling stays very hot. For a California touch, sprinkle in a few chopped California almonds before sealing.
Tried this recipe?
Let us know how it was!Source: Learn More About This Dish
Can I Use a Different Cone?
Stick with waffle cones, trust me. Sugar and cake cones are too thin and crack under the filling weight. You’ll end up with a mess. Waffle cones are durable, hold more goodies, and toast beautifully over the fire.
Can I make Reese’s Campfire Cones ahead of time?
Absolutely. Assemble the cones, wrap them tight in heavy-duty foil, and store in the fridge for up to 8 hours. For camping trips, keep them in the cooler. Just be gentle so you don’t crush the cones.
What other fillings can I add to my cones?
Get creative! Sliced bananas, nuts, pretzel pieces, or caramel bits all work great. For a seasonal twist, try peppermint candies in winter or strawberries in summer. Just keep the marshmallows as your base layer for structure.
How do I prevent the cones from burning?
Keep them over hot coals, not open flames. Turn them every minute or two. And check at the 5-minute mark for doneness. If you see chocolate leaking, that means a seam opened. Tighten the foil seal.
Can I use regular marshmallows instead of mini marshmallows?
Sure! Just cut them into quarters so they melt evenly. Mini marshmallows are easier because the melting happens faster and more uniformly. They also fill the cone more completely without big air gaps.
Is it possible to make these cones without an air fryer?
100%, and honestly I prefer it. The campfire method gives you this amazing smoky flavor. But if there’s a fire ban, the oven at 350°F for 10-15 minutes works beautifully. A gas grill is another great option.
How do I eat Reese’s Campfire Cones without making a mess?
Eat them over a plate or napkin. Peel back the foil slowly, let the steam escape, and dig in with a spoon if needed. The foil catches most drips. And always let them cool 2 minutes first.
Can I reuse the foil for another batch?
No. Use fresh foil for each cone. Reusing foil risks tears, poor sealing, and hygiene issues. Foil is cheap. Your dinner isn’t worth saving a few cents over. Just use new sheets each time.
Are Reese’s Campfire Cones gluten-free?
They can be. Search for gluten-free waffle cones at places like Whole Foods or specialty grocers. Always check the packaging on your Reese’s products too to verify their gluten-free status, since manufacturing can vary.
How do I store leftovers?
Cooked cones are really best eaten fresh. The cone gets soft once the chocolate solidifies. If you must save one, wrap it and refrigerate. But know that reheating won’t give you that original crispy texture back.
Can I make these with homemade waffle cones?
Definitely. If you’ve got a waffle cone maker and the patience, homemade cones make this dessert extra special. Just let them cool completely before filling. They’re more fragile than store-bought, so handle gently.